
.avif)

In this hands-on guide, you’ll learn how to use Claude AI to easily customize one of the existing JointJS demos precisely according to your needs.
If you’re trying to build a Proof of Concept (PoC) for an application based on JointJS, or if you’re simply trying to evaluate if JointJS can fit your actual needs, the easiest way is to start from an existing JointJS demo that’s close to your use case and adjust it by changing the UI or layout, adding new features or additional workflow actions and triggers.
You don’t need to know the ins and outs of JointJS for that; you can use an AI Coding agent (like Claude Code) and have a PoC ready in minutes.
In this guide, we’ll create a working proof of concept for an AI-powered workflow builder based on the AI Workflow Builder Demo.
To get there, we’ll customize the demo in five key ways:
We will tweak and extend the AI Workflow Builder Demo with Claude Code. Note that the process will be similar for any other demo, and the steps outlined here will work with any AI Coding agent.
Before starting, you can use AI to find the demo that best matches your needs.

Prompt you can use and copy-paste to find the appropriate demo for your use case:
I want to build a proof of concept for
[WHAT YOU'RE BUILDING] for [MORE CONTEXT].

Which JointJS demo should I use as a starting point?
Now that we have a starting point, we can find the demo’s source code.

In the GitHub repository, select the JavaScript, TypeScript, or React version. You’ll find links to each in the “Available Versions” section, or you can open associated folders (js, ts, or react) in the repository directly.
In the README.md of the selected version, you’ll find an npx command to download the demo.
npx @joint/cli download ai-agent-builder/js
Run the command in your terminal, and a new folder named ./ai-agent-builder-js will be created. (Note that the last part of the folder name will be specific to the version you selected: js, ts, or react.)
Open the folder in the terminal and run npm install to install all project dependencies. Before running npm install, make sure you have a JointJS Access token set up, as you will need it to use JointJS+ features.
> Using JointJS NPM Repository
Once the dependencies are installed, test the demo by running npm start and opening the project locally at http://localhost:8080/ — you should see the working JointJS application in the browser.
We’ll switch to Claude Code for the next steps. You can use it directly from the terminal/console or from your editor. For this guide, we’ll use Visual Studio Code.
Coding AI agents are great at understanding code, so you can use this to your advantage to get a clear idea of how the JointJS demo you want to utilize as a boilerplate is structured.
Claude Code will give you the best results when exploring and analyzing codebases if you utilize its Plan Mode. When working from the terminal, enter the plan mode using the /plan command. In VS Code, you can switch Claude’s prompt input field to Plan Mode by pressing Shift+Tab when the field is focused, or clicking on the mode label.
Claude Code will do well even with simple instructions like "Explain this codebase," but the more context you give it, the better results you’ll get. If you’re not familiar with the library used in the codebase, make sure to state this in your input.
A slightly more detailed prompt can give you much better results:
Explain this JointJS codebase. I'm not familiar with JointJS.

Give me a high-level overview of the key things
I need to understand to tweak it effectively with AI.
Claude Code might ask you for permission to execute scripts and code—allow it. Once it finishes, you will get a clear overview of everything you need to know—from the mental model and architecture to files where you might need to make changes and common pitfalls.
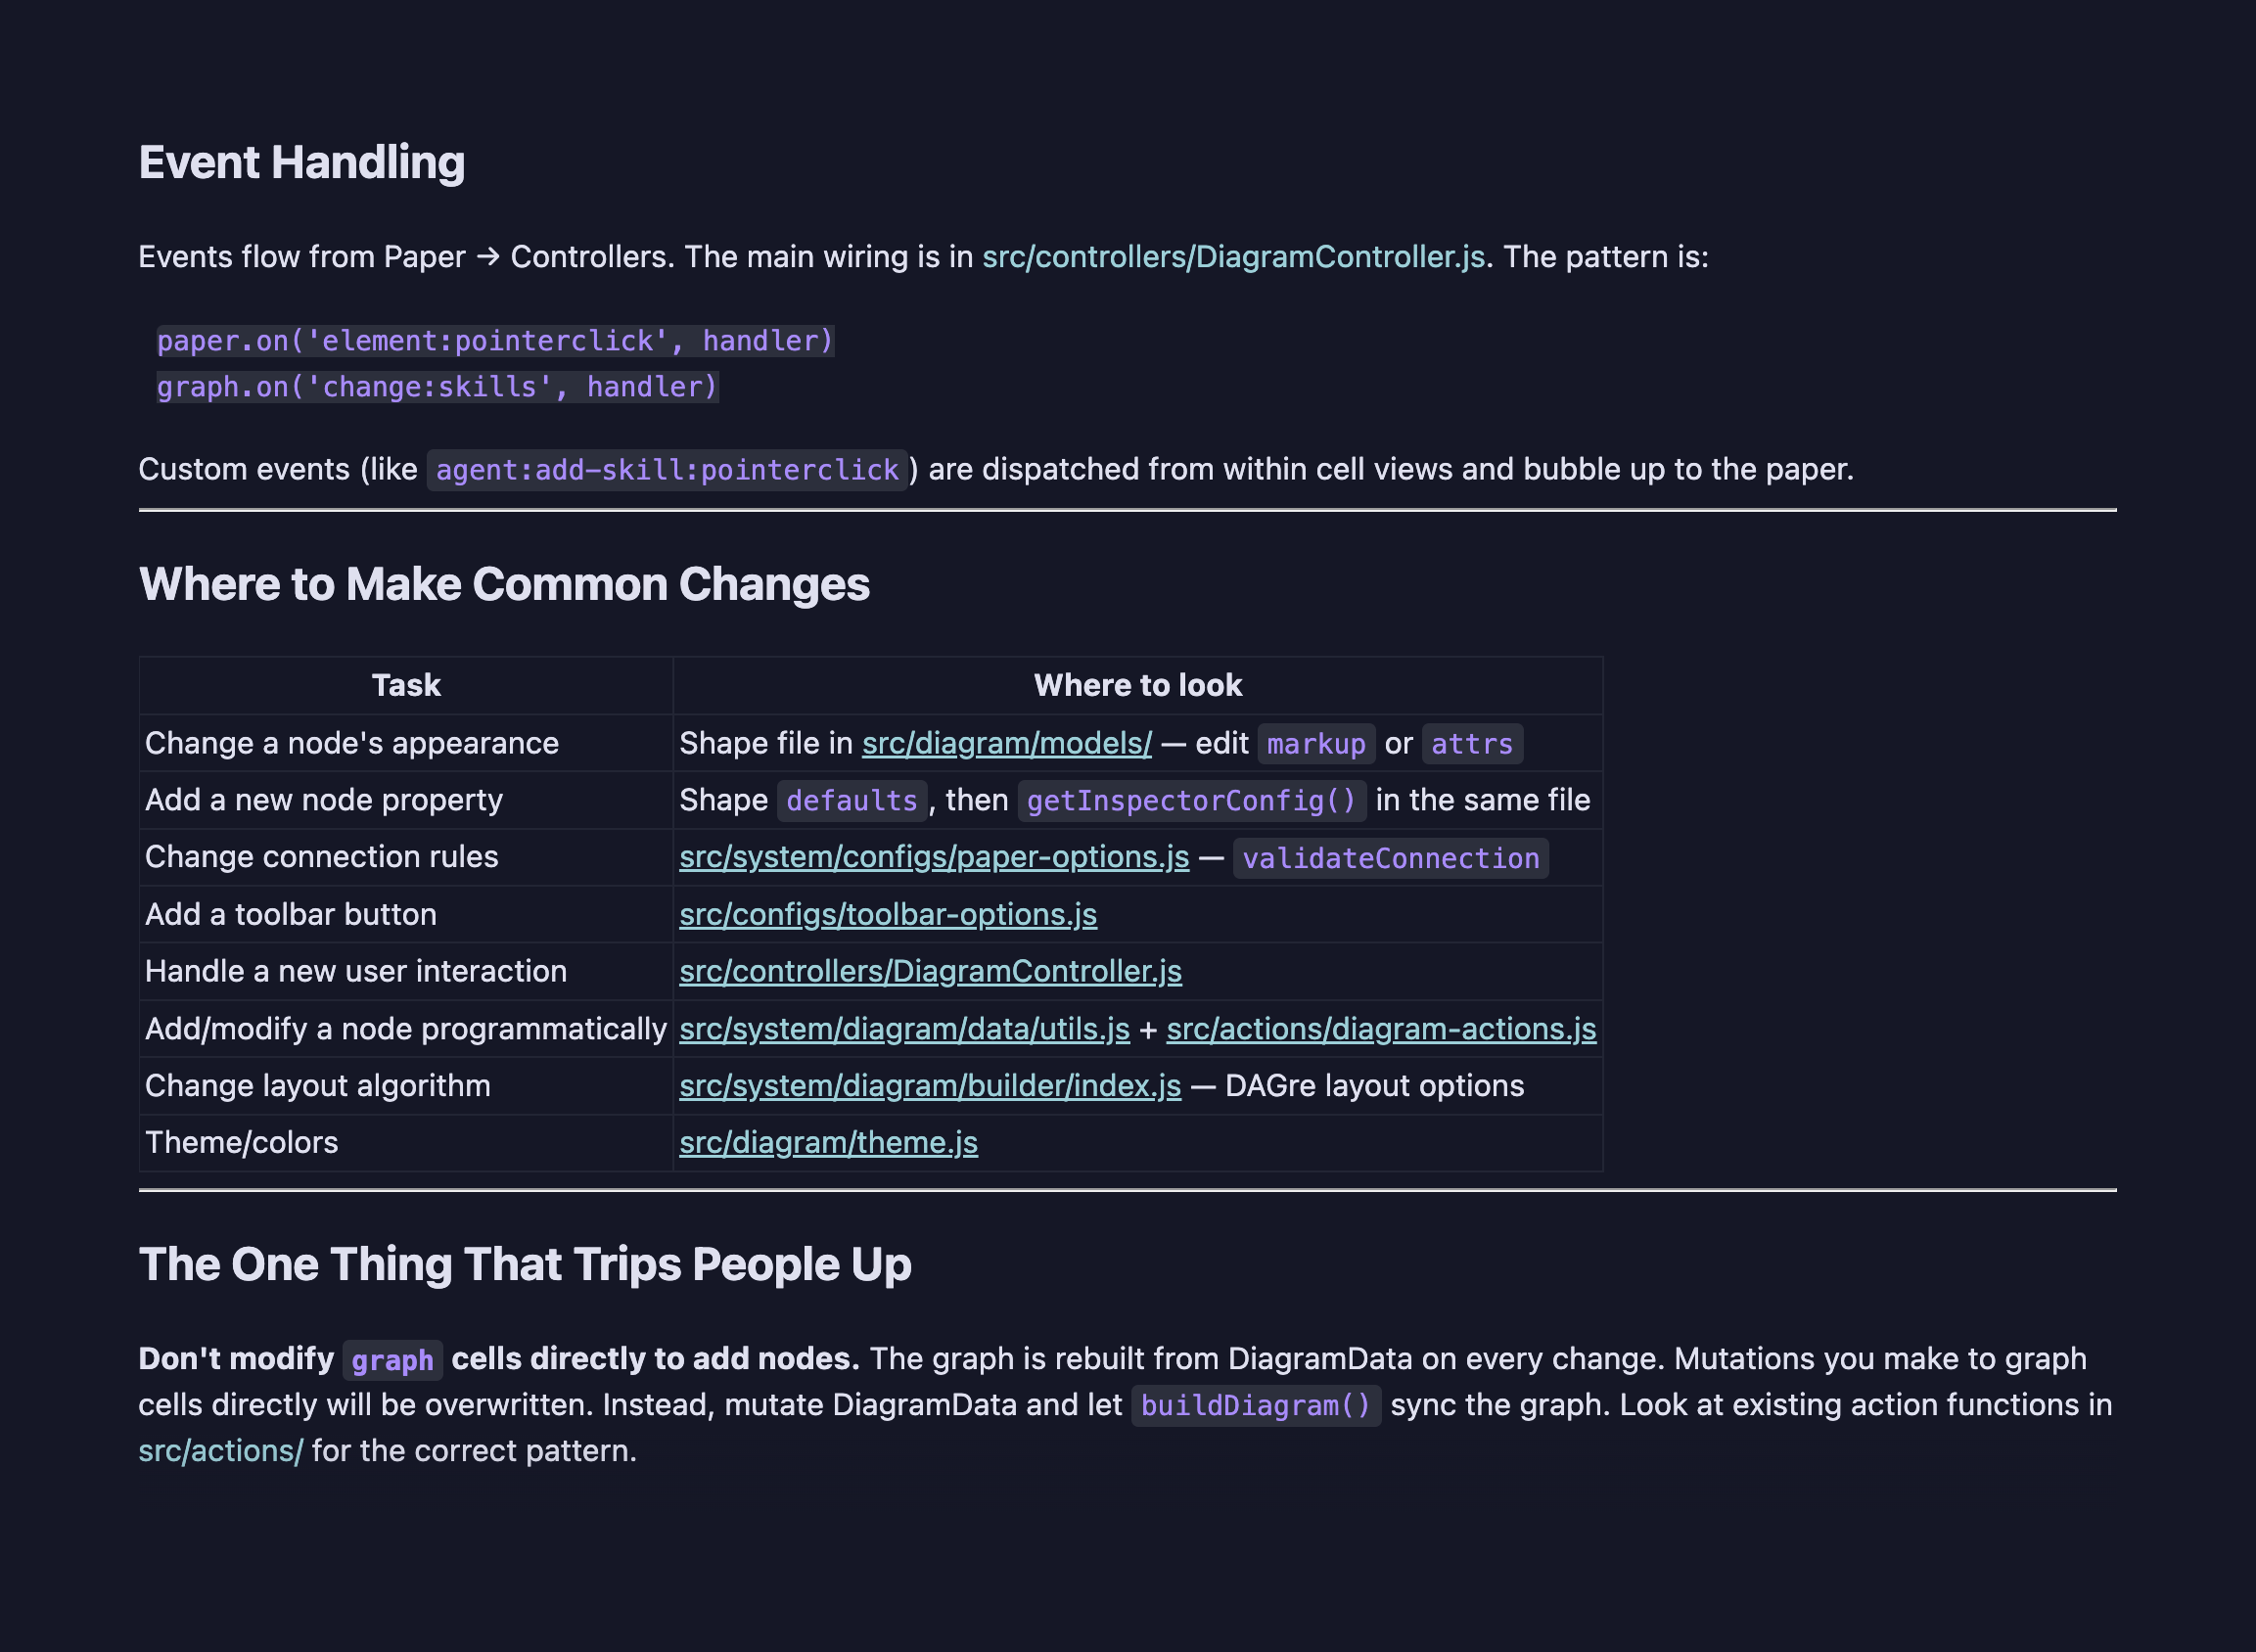
If something isn’t entirely clear, or if you want to understand something in more detail, you can always ask follow-up questions. If you wanted to learn more about basic concepts of JointJS — Paper and Graph, you could follow up with a question like this:
Can you explain in detail the concepts of Paper and Graph in JointJS?We will adjust the demo styling according to the JointJS brand. You can easily accomplish this by asking AI to extract the color scheme from your website (we’ll use jointjs.com). If you add your logo to the project, Claude Code can easily implement it into the UI. We’ll add it to /assets/images/jointjs-logo.svg.
Note that Claude Code already mapped the JointJS demo app in our previous prompt — that context is valuable, and it needs to be rebuilt in a new session, so stay in the same chat for follow-up requests when building your JointJS PoC.
Switch the prompt mode to “Edit automatically” and enter the prompt:
I want to change the theme and branding, according to my brand colors.

Use styles from jointjs.com and the logo
@assets/images/jointjs-logo.svg to update this demo.
Claude might ask you for permission to fetch URLs, edit files, or run scripts—allow it. As a rule of thumb, allow any requests and edits that Claude Code requires that you’ll encounter while building your PoC.
As Claude Code works, you’ll see the steps it takes and which code it changes. You don’t have to worry too much about it yet; we’re working on a PoC after all, so the only thing that matters is that the changes AI makes are working and not breaking the demo.
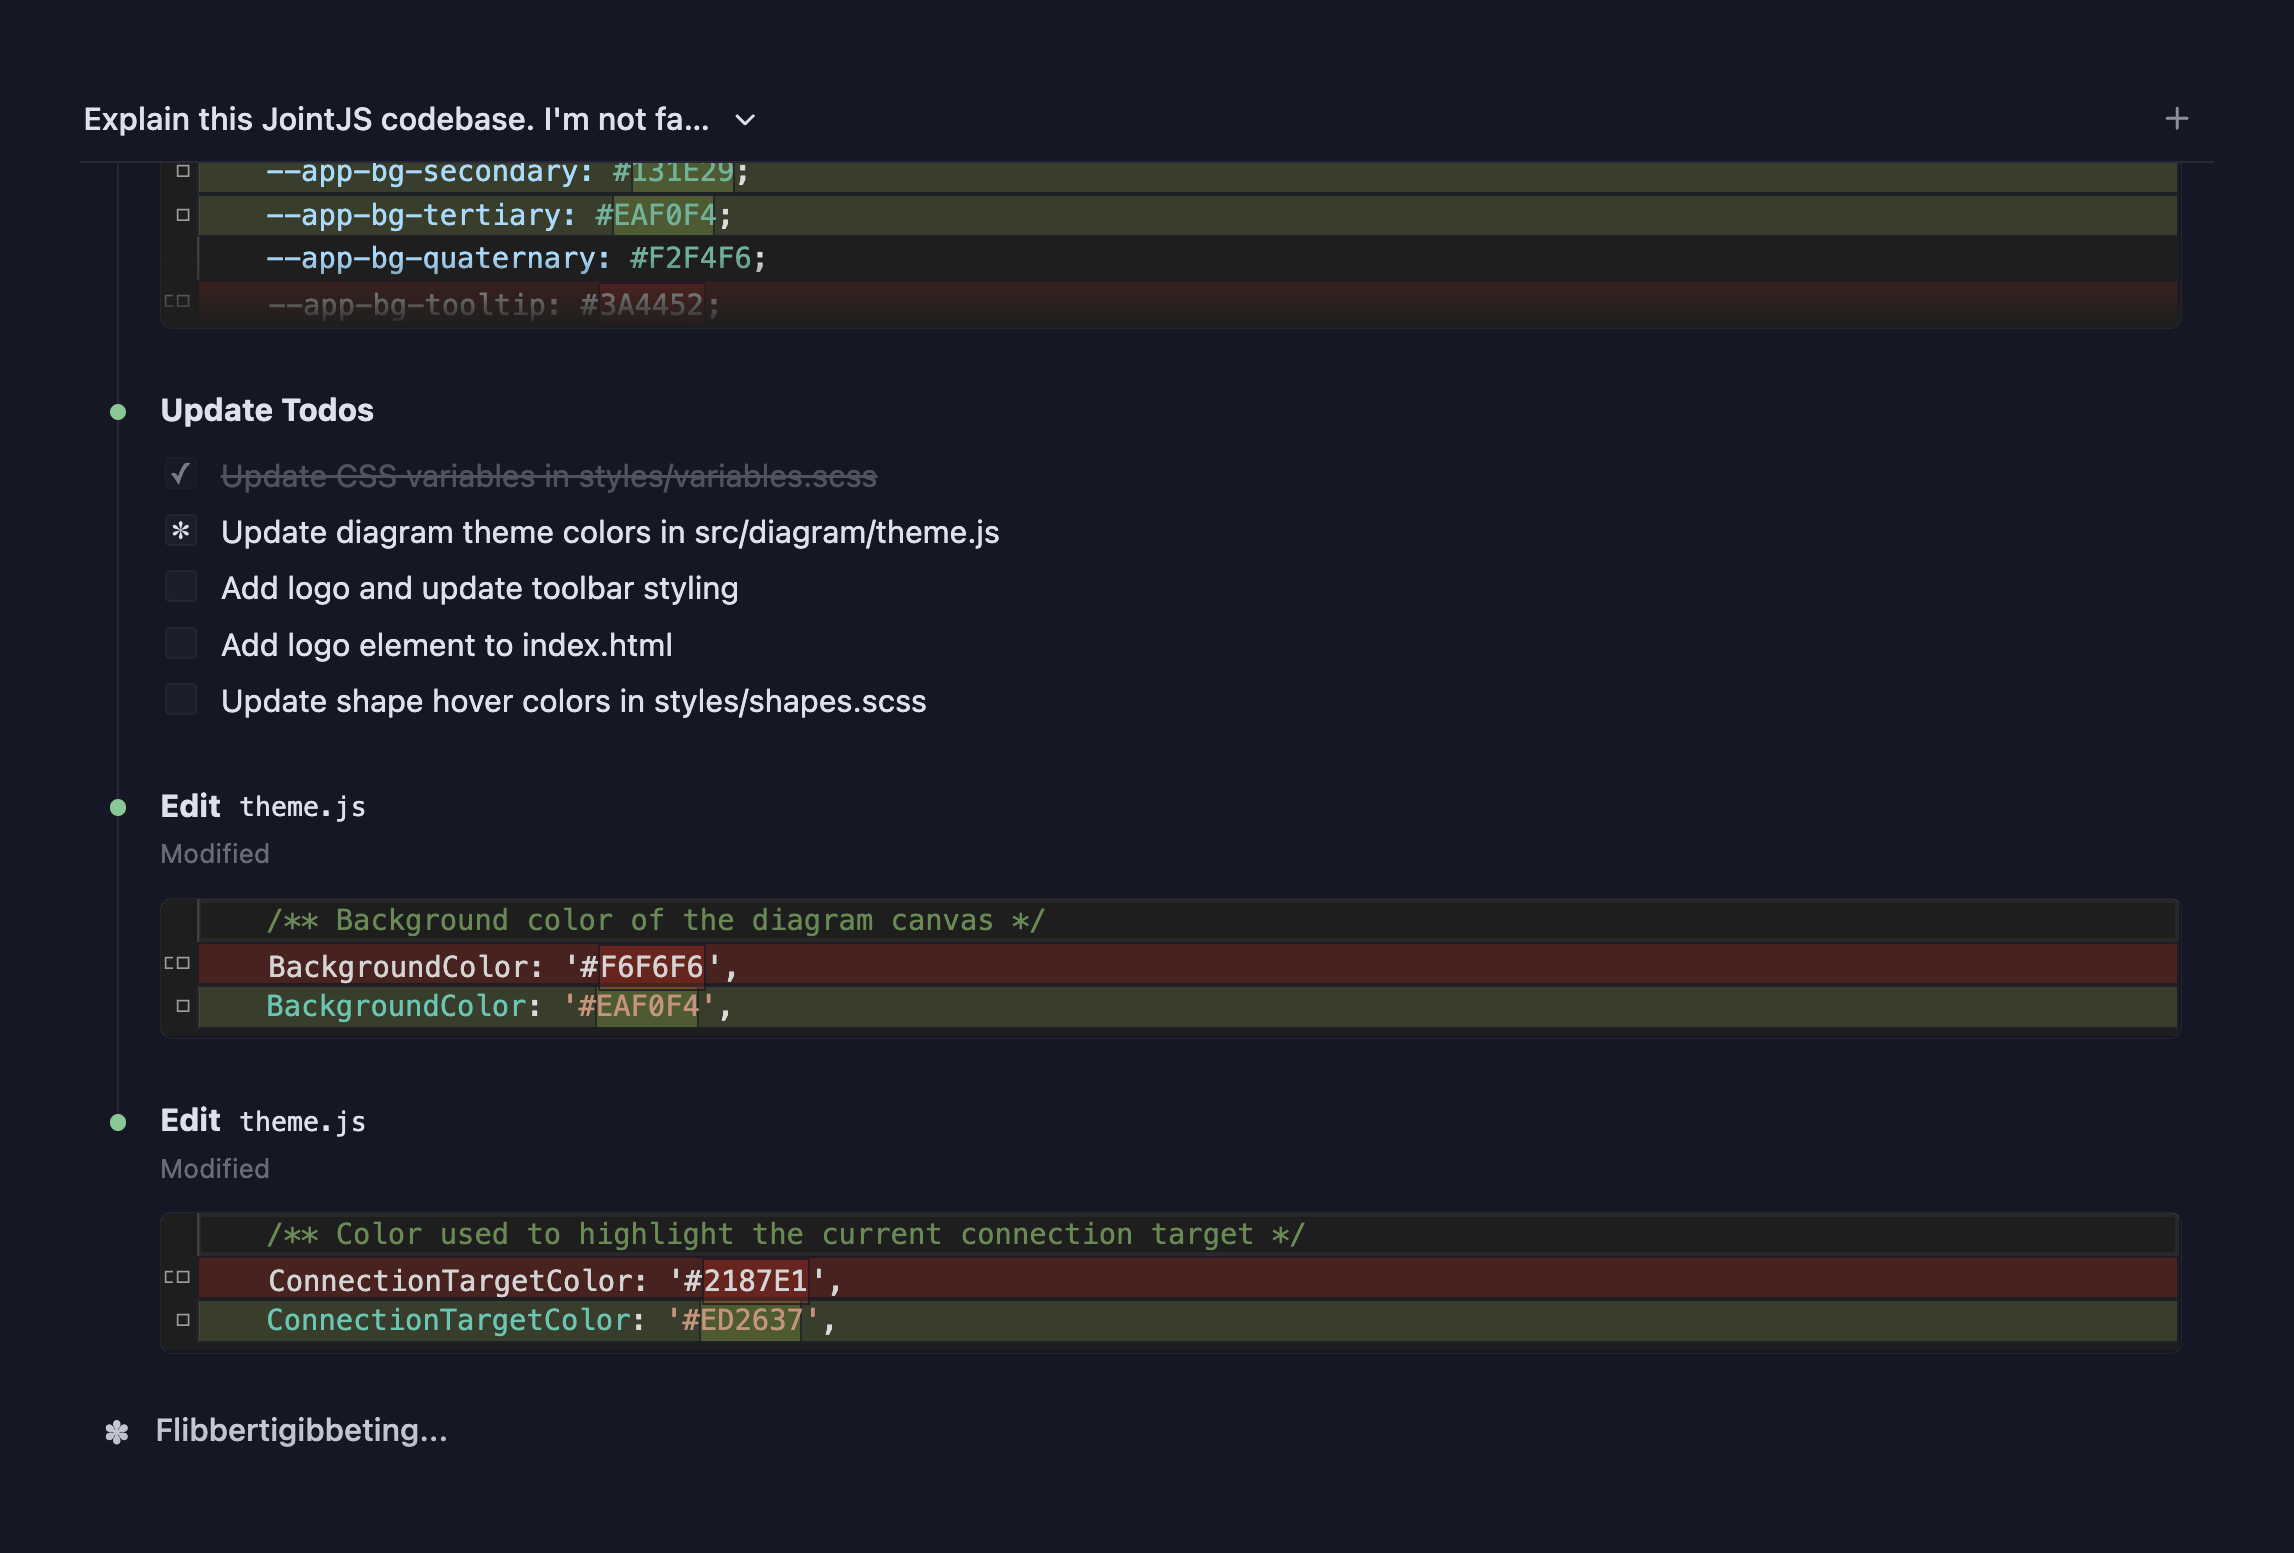
Once Claude Code finishes, you’ll see the summary of these changes. Whenever a coding agent implements a change, test your application in the browser to make sure you got the result you wanted and that everything is working properly.
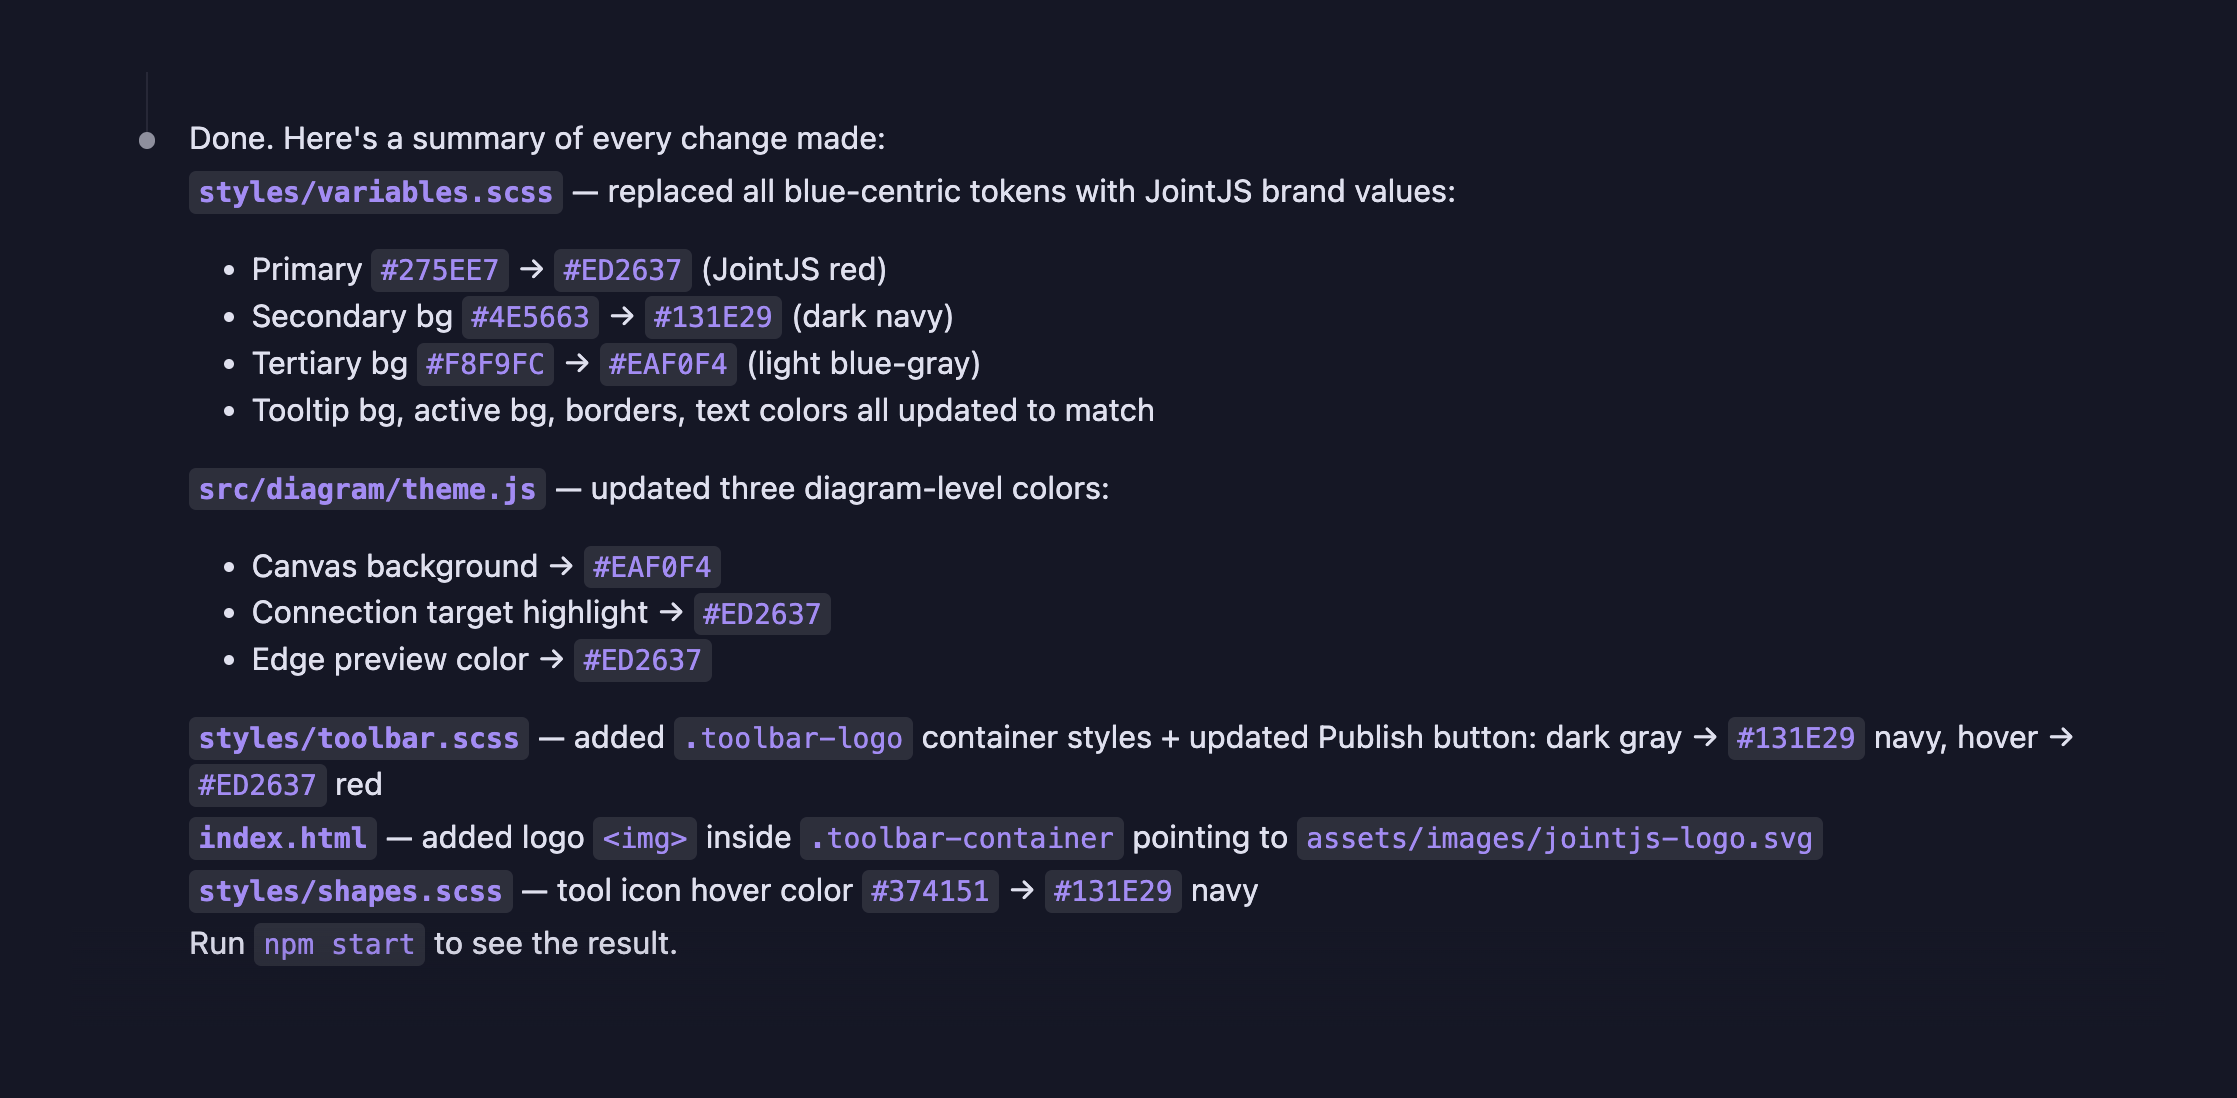
If you’re not satisfied with the initial results, you can ask for additional changes and edits. Alternatively, if you want to tweak something manually, you can always jump directly into the relevant code, as you’ll see the summary of the exact changes AI made across the project.
Next, you might want to tweak the User Interface (UI) according to your preferences. If you want to remove the minimap, ask Claude Code to remove it. If you want to add an element or a feature, ask for it in plain language—you don’t even have to understand the specific JointJS terminology, AI figures it out nicely.
Sometimes you’ll need to refine the prompt or make a different request, but in my experience, you can get the results you’re looking for really quickly.
Let’s change the UI so the line leading up to the box the user selects glows up. A prompt like this one, explaining the change you want to make, can work well:
When I select a box, I want the entire line
from the start to the selected box to light up
so the path is visually clear.

Use the JointJS features when possible.
If you’re familiar with JointJS features (see the full list), you can refine the prompt to include the specific one you want to utilize. If you add documentation context, AI can do a better job—note that this isn’t necessary, AI will do well even if you don’t specify the specific JointJS feature.
When I select a box, I want the entire line
from the start to the selected box to light up
so the path is visually clear.

Use the JointJS Highlighters API
documented at https://docs.jointjs.com/learn/features/highlighters/.
Upon completion, Claude Code will provide a summary of the changes made. Always run the demo after the agent finishes something to test out if it really works.

The path implemented in our example is highlighted in JointJS red, which is precisely what we want.
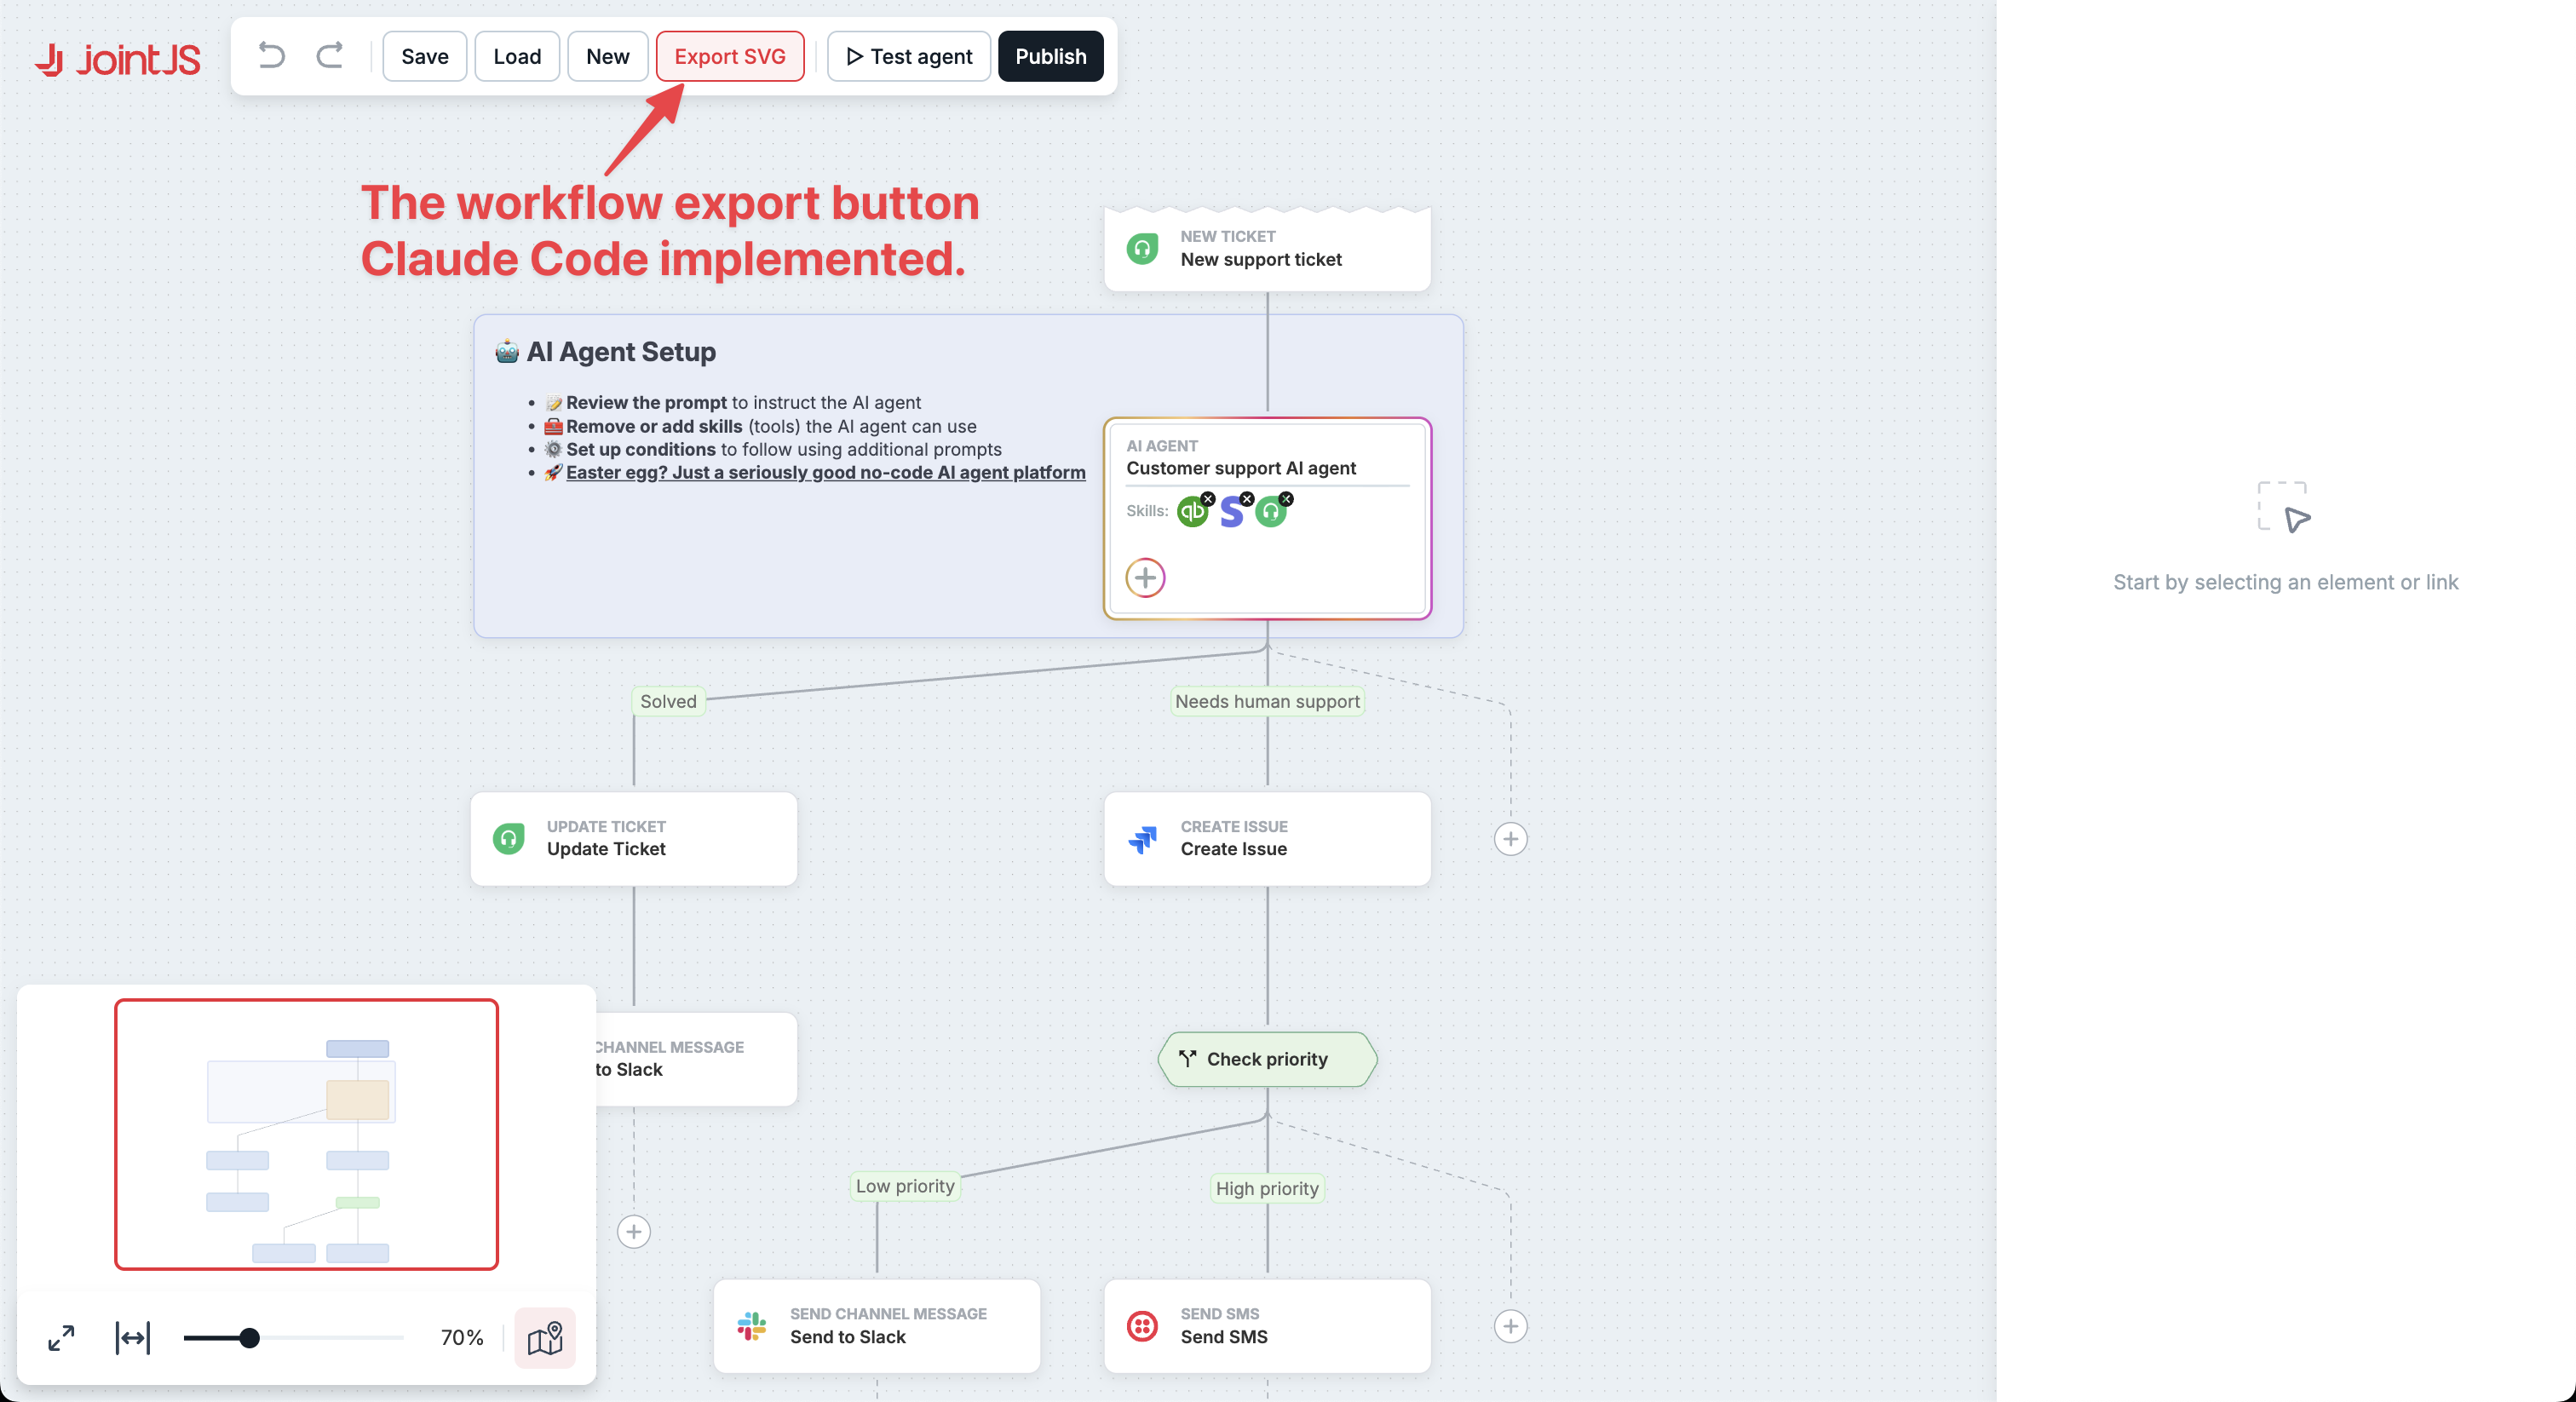
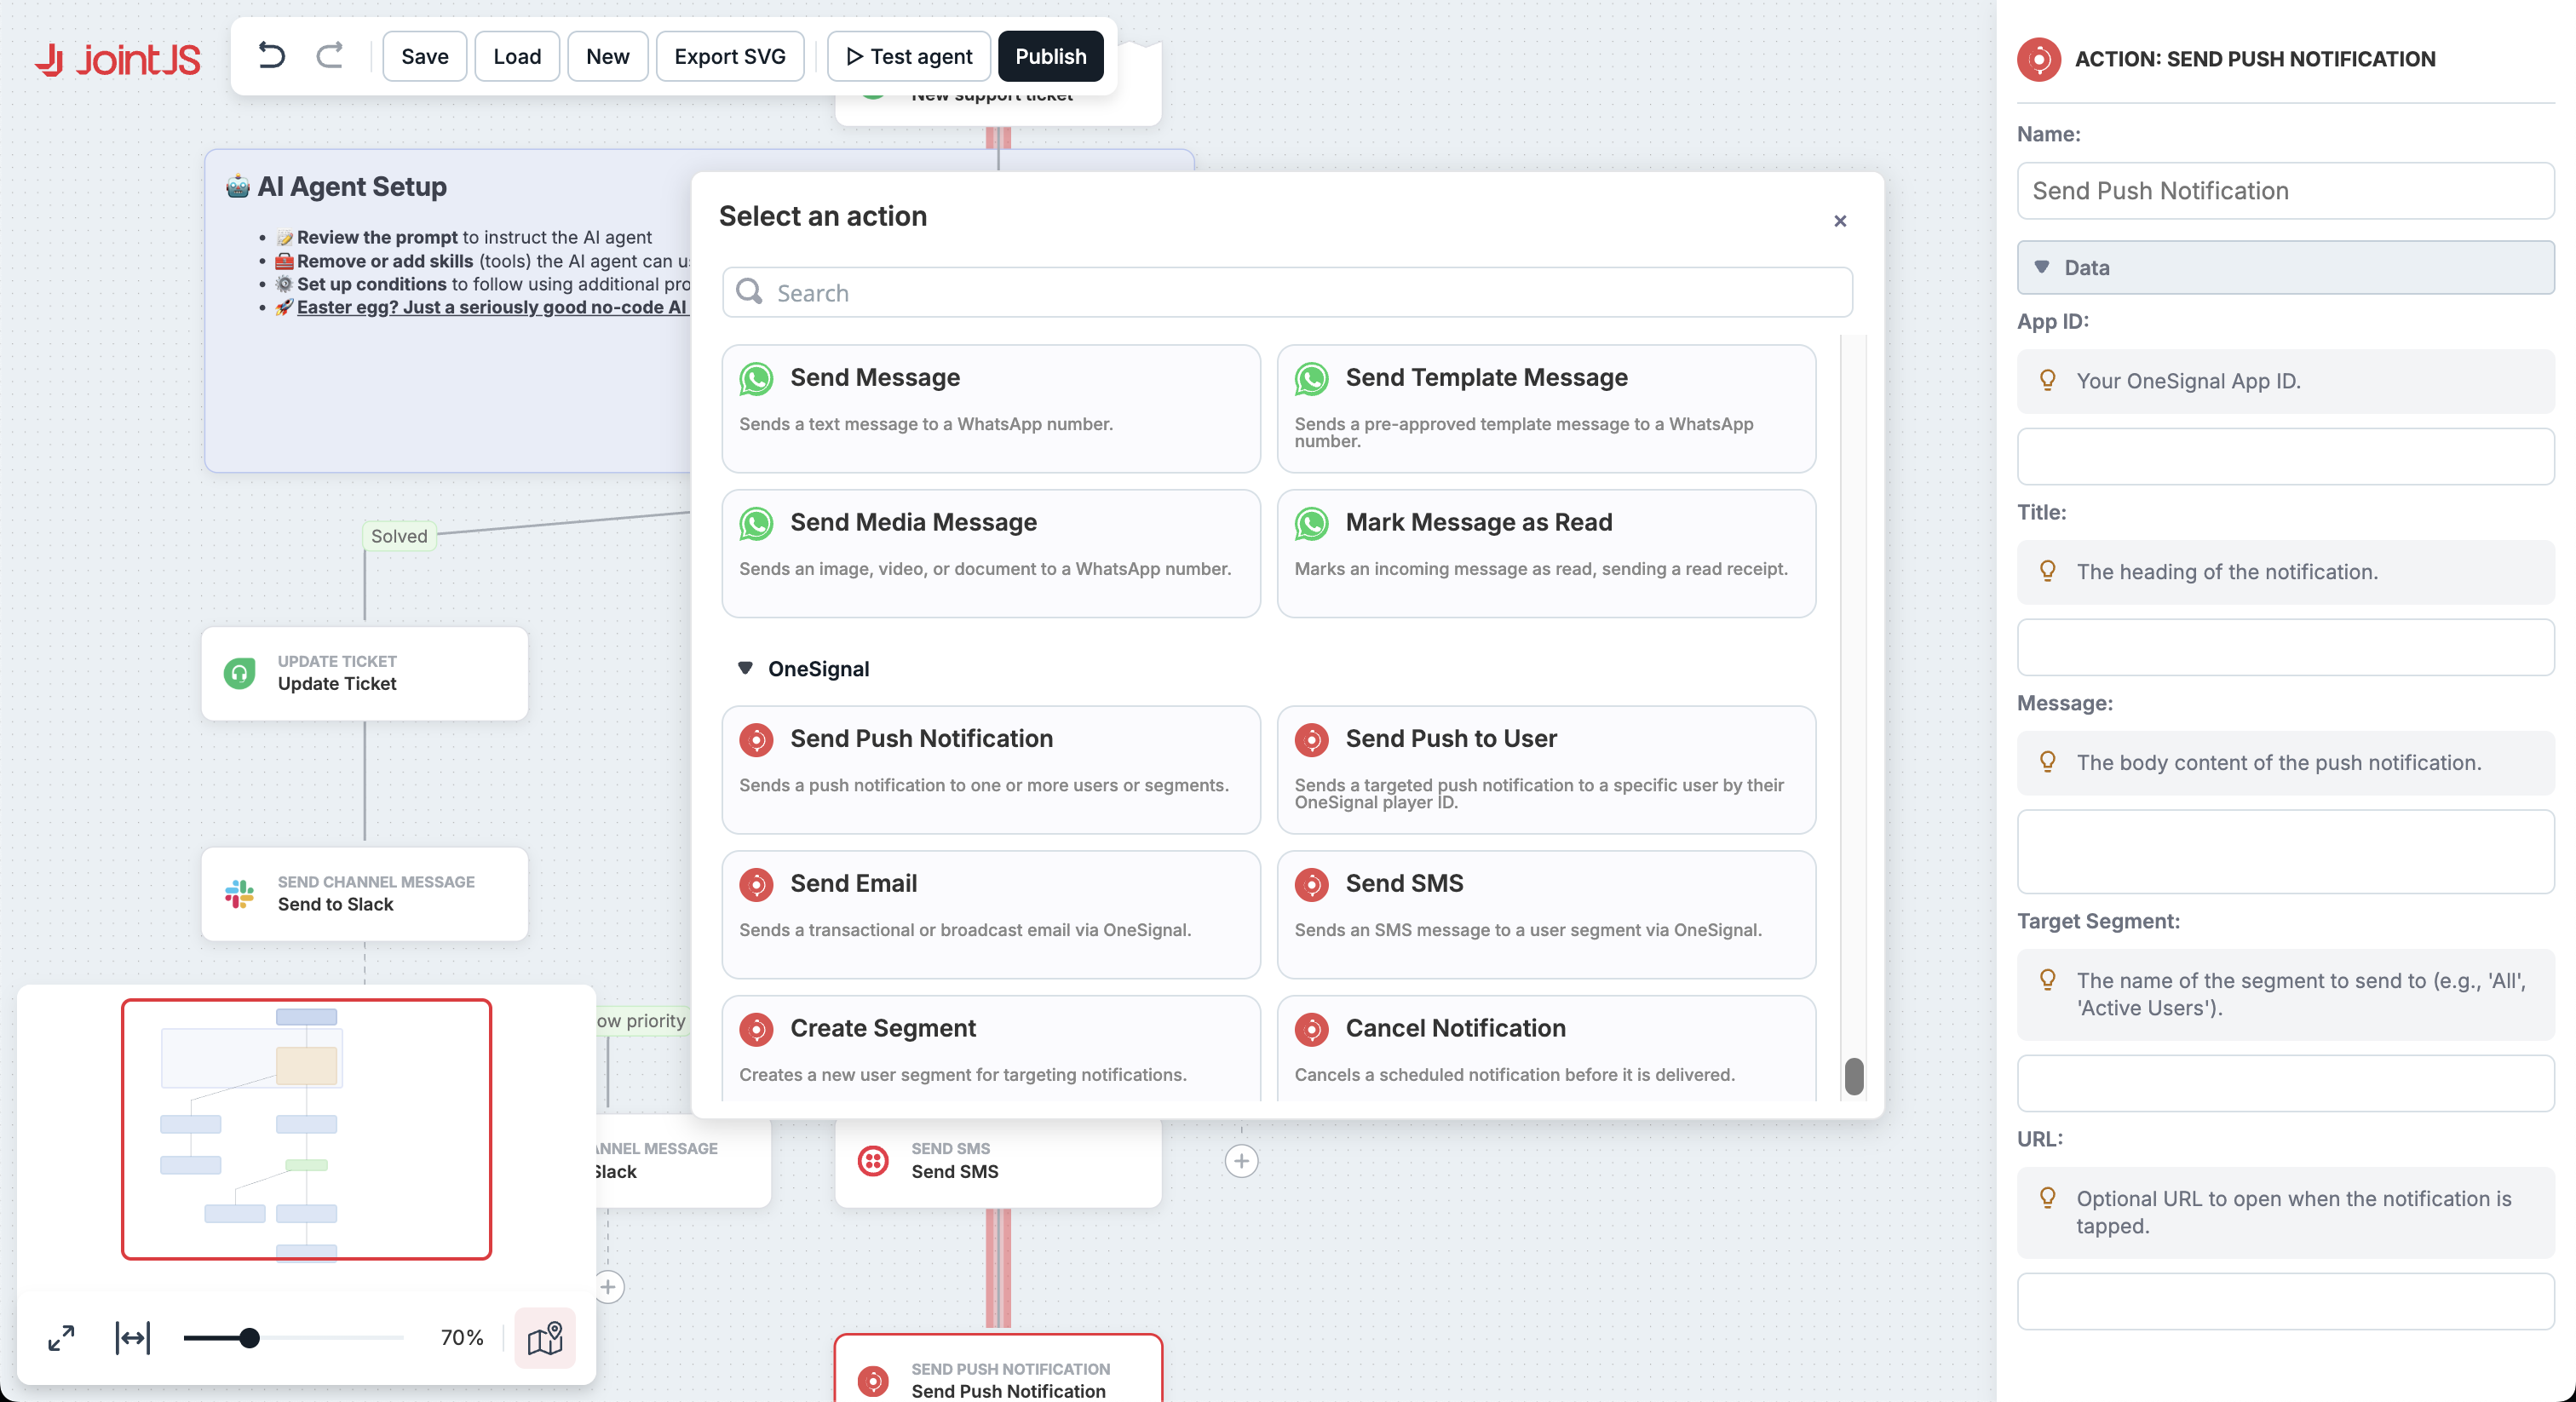
Currently, we can export the workflow as JSON; let’s add another feature, the ability to download an image. We will need a separate button on the toolbar for this.
Add a button to the toolbar that allows
the user to download an image of the entire workflow.

Use the JointJS+ "format" feature to export the image as SVG,
as documented at https://docs.jointjs.com/api/format/SVG.
You don’t have to specify the exact JointJS feature that should be used—you can just add Use JointJS+ features where possible.
If at any point while tweaking things you get an error, know that this is a common occurrence with AI workflows. You can easily copy and paste the error from the browser into the AI prompt to instruct the coding agent to fix it.
Apart from tweaking existing code, you can easily use coding agents to add additional features to JointJS demo apps.
The AI Workflow Builder Demo we’re using includes many predefined actions—you can see them in the browser or in the code, under /assets/config/actions.json.
Let’s say we’re using something else that’s not on this list—perhaps WhatsApp and OneSignal. As with everything, we’ll ask Claude Code to implement these sets of actions for us.
Add common WhatsApp and OneSignal actions.
Note that we’re still in the same chat window, meaning the context is preserved, so we don’t have to specify that we want to use JointJS features or which version of the framework we’re actually using.
AI updated the actions.json file correctly and added the appropriate icons.
You’ll have a better idea of which actions or triggers you need, so you should be able to tailor the prompt precisely to your needs.
You can use the same principle to implement new triggers and even entirely new features—Claude Code will understand when JointJS APIs can be utilised, and implement custom code when needed.
In this guide, we used Claude Code to quickly tweak the demo app branding, improve the user interface, and even add new JointJS features and workflow actions.
A short video showcasing the UI changes we made and the new features we added.
We set up a demo with the changes and features introduced in this article and loaded it with a more complex workflow you can test in action: AI-Powered Customer Support Ticket Workflow Demo.
Using AI coding agents, such as Claude Code, you can very quickly and very easily create a PoC for your company that doesn’t just slightly tweak styling, but actually adds new features and adjusts everything according to your needs — and you don’t even have to understand JointJS concepts to be able to accomplish that.
Use one of 180+ JointJS demos as a starting point, tell an AI Agent what you want to tweak, change, or add, and you can have a fully working prototype ready in minutes.
Additionally, this demonstrates that you can utilize AI coding agents when working with JointJS even outside of the prototyping phase—and in case AI gets stuck, you can always rely on world-class customer support of JointJS+.
Happy AI diagramming!


.png)


.jpg)
