If you've ever built a workflow automation tool, you've likely faced a choice: use an off-the-shelf modeler that looks generic, or build something custom that fits your product. This tutorial walks through a third option — taking the JointJS+ BPMN Editor demo and turning it into a domain-specific modeler that talks directly to Camunda 8 for process orchestration.
The result is a modeler where users design BPMN workflows visually, configure Camunda-specific properties (HTTP connectors, I/O mappings, FEEL expressions) in the property panel, and deploy, start, and reload processes — all without leaving the editor.
Full source code: https://github.com/clientIO/joint-demos/tree/main/bpmn-camunda-integration
Camunda 8 is a process orchestration platform built around Zeebe, a distributed workflow engine. What makes it interesting for custom integrations is that it runs fully headless — you deploy BPMN XML, start process instances, and query their status entirely through APIs. There is no mandatory UI. Camunda ships with Operate (a monitoring dashboard) and its own modeler, but neither is required. You can replace the modeling experience entirely with your own.
Camunda exposes two API surfaces:
This separation matters because some operations (like querying deployed processes) are only available through the REST API, while deployment and execution go through gRPC.
JointJS+ is a commercial diagramming library built for embedding into web applications. Unlike standalone modeler tools, it's designed to be extended — you define your own shapes, wire up custom property panels, and control the full editing experience programmatically. It ships with a BPMN Editor demo that implements the complete BPMN 2.0 notation out of the box: a drag-and-drop stencil, an inspector panel with Content and Appearance tabs, a minimap, keyboard shortcuts, and bidirectional BPMN XML import/export.
Building a BPMN modeler from scratch — correctly rendering pools, lanes, boundary events, message flows, and handling dozens of BPMN element types — is months of work. Starting from the JointJS+ BPMN demo means the rendering and base editing experience is already in place. What remains is tailoring it to your domain: trimming the stencil, adding custom properties for your workflow engine, and wiring the export/import to produce the XML your engine expects. That's the approach this tutorial covers.
The goal is a proof-of-concept that connects the JointJS+ BPMN Editor to a self-hosted Camunda 8 instance. Concretely, the modeler should:
At a high level, the integration comes down to three concerns:
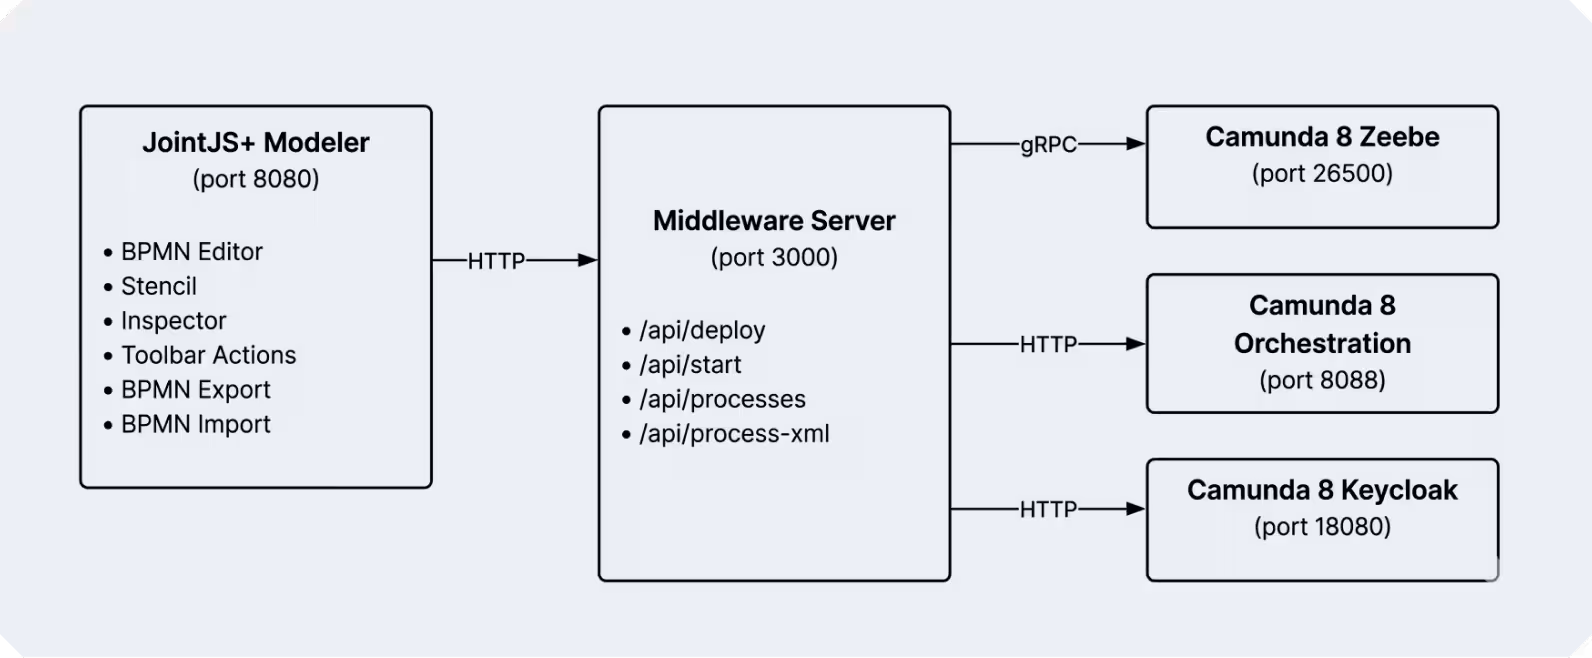
The middleware is necessary because the browser cannot speak gRPC directly to Zeebe, and because OAuth tokens for the REST API should not be exposed to the frontend. The PoC uses Node.js with Express, but this layer is thin enough to implement in any language — Python, Go, Java — as long as it can talk gRPC to Zeebe and forward HTTP to the frontend.
The server has four responsibilities: deploy BPMN files, start process instances, list deployed processes, and fetch BPMN XML for a given process definition.
import { ZBClient } from "@camunda8/zeebe";

const zb = new ZBClient("localhost:26500", {
  useTLS: false,
  oAuth: {
    url: "http://localhost:18080/auth/realms/camunda-platform/protocol/openid-connect/token",
    audience: "orchestration-api",
    clientId: "orchestration",
    clientSecret: "secret",
  }
});Deploying accepts a BPMN file via multipart upload. Starting a process instance uses bpmnProcessId rather than the numeric definition key — it's more readable and more reliable across redeployments.
app.post("/api/deploy", upload.single("bpmn"), async (req, res) => {
  const result = await zb.deployResource({
    name: req.file.originalname || "process.bpmn",
    process: req.file.buffer
  });
  res.json(result);
});

app.post("/api/start", async (req, res) => {
  const { bpmnProcessId, version = -1, variables = {} } = req.body;
  const result = await zb.createProcessInstance({ bpmnProcessId, version, variables });
  res.json(result);
});Listing deployed processes and fetching their BPMN XML requires the Orchestration REST API (Zeebe gRPC does not expose query operations). This means a separate OAuth-authenticated HTTP client:
app.get("/api/processes", async (req, res) => {
  const result = await orchFetch("/process-definitions/search", {
    method: "POST",
    body: JSON.stringify({
      page: { from: 0, limit: 100 },
      sort: [{ field: "version", order: "desc" }],
    }),
  });
  res.json(result);
});

app.get("/api/process-xml/:key", async (req, res) => {
  const result = await orchFetch(`/process-definitions/${req.params.key}`);
  res.json({ bpmnXml: result.bpmnXml });
});
Since the modeler runs on :8080 and the server on :3000, you'll need CORS headers on the middleware (e.g., the cors Express middleware). Note that this PoC exposes unauthenticated endpoints that can deploy arbitrary BPMN and start process instances. Do not expose this server beyond localhost without adding authentication. The hardcoded clientSecret: "secret" in the Zeebe connection config is a Camunda development default — replace it with environment variables in any non-local deployment.
The JointJS+ BPMN demo ships with the full BPMN 2.0 element set:
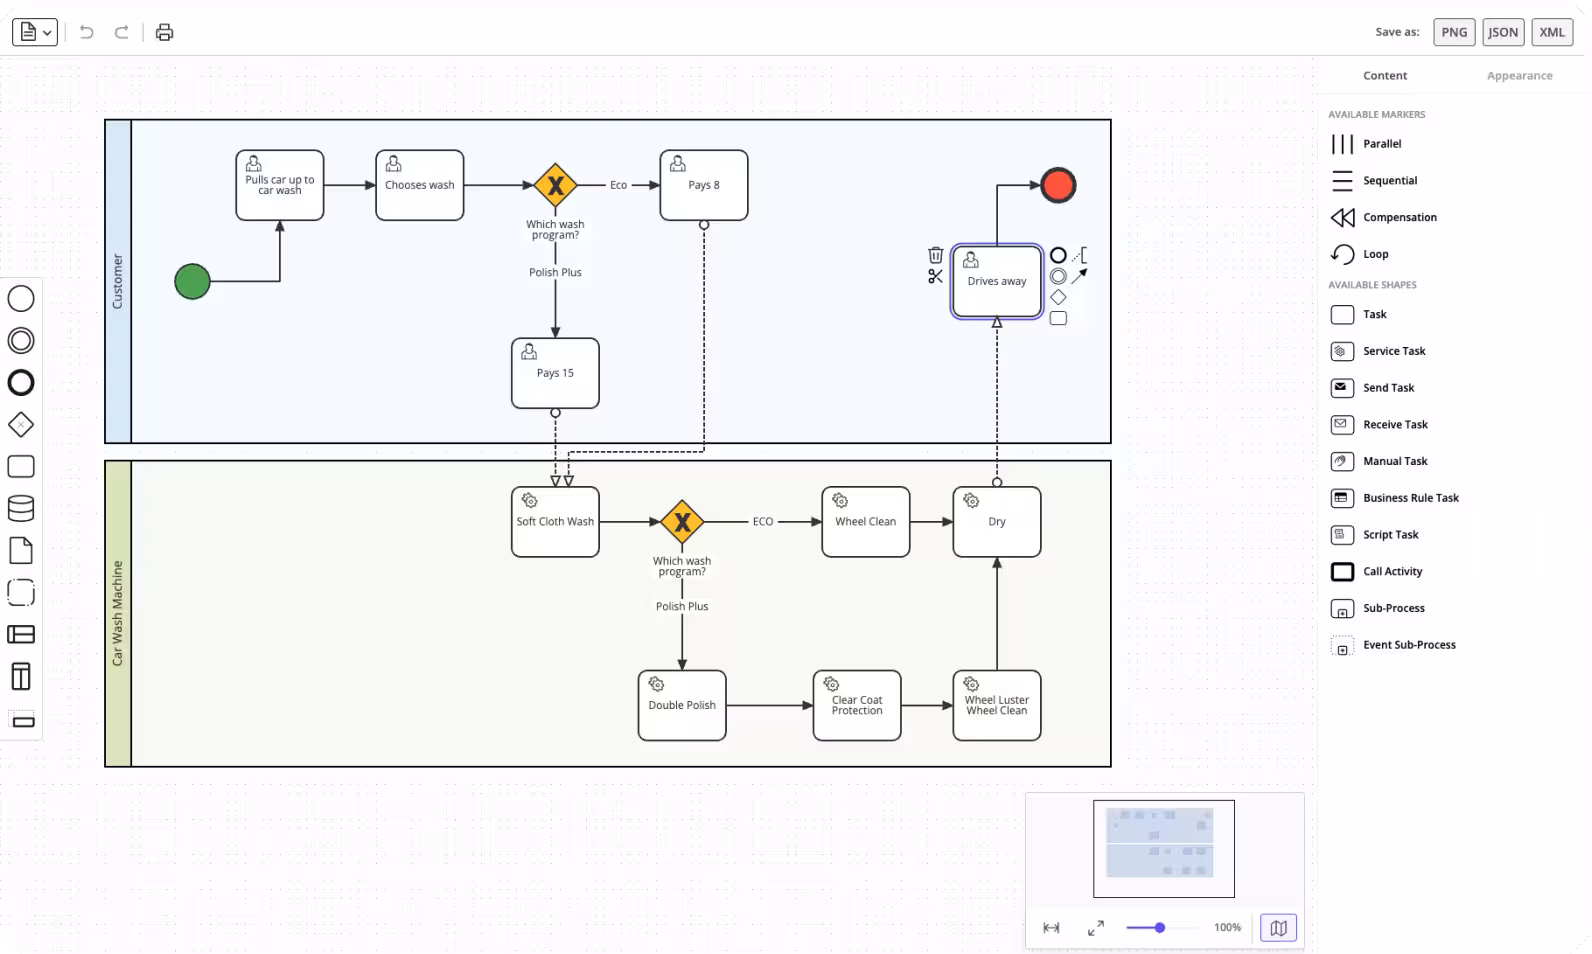
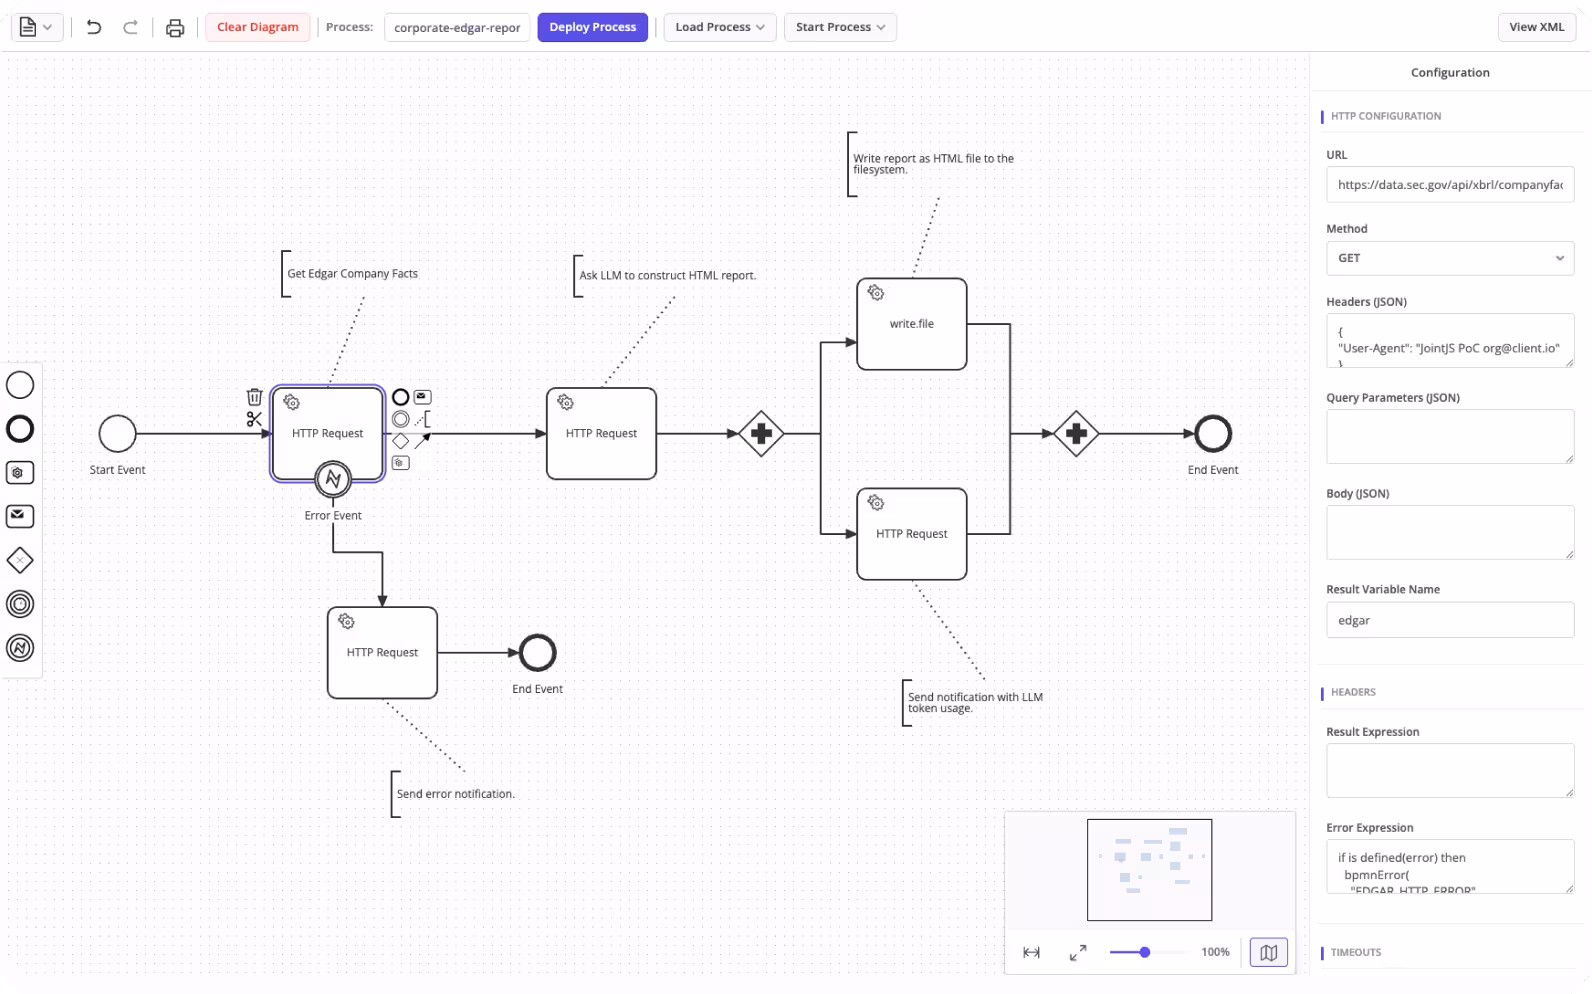
For a domain-specific modeler, the first thing to do is trim the stencil down to what your workflows actually need. In our case: Start Event, End Event, Service Task, HTTP Connector, Exclusive Gateway, Timer/Error Boundary Events, and Sequence Flow. This keeps the palette focused and reduces the surface area for things Camunda 8 doesn't support (like message flows between pools).
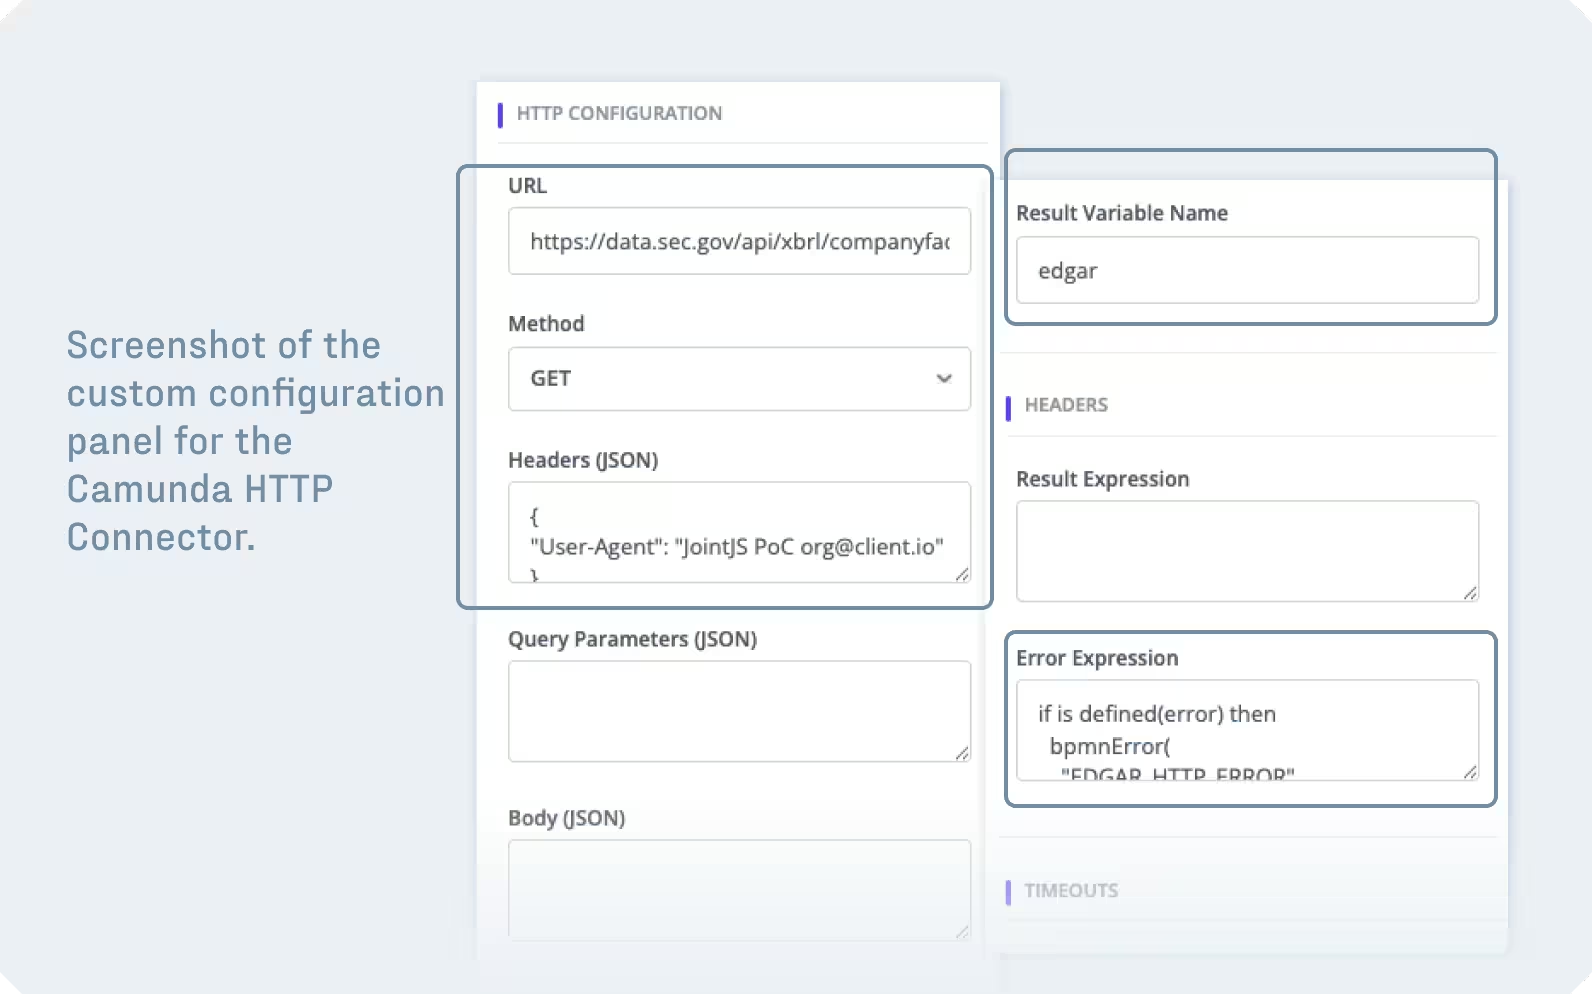
Camunda 8 connectors (like the HTTP JSON connector) are BPMN service tasks under the hood — they just carry specific Zeebe extension elements. To give them a first-class editing experience, we define a custom JointJS shape with domain-specific properties:
export class HttpConnector extends Activity {
  defaults() {
    return util.defaultsDeep({
      type: 'activity.HttpConnector',
      httpConfig: {
        url: '',
        method: 'GET',
        headers: '',
        body: '',
        resultVariable: '',
        connectionTimeoutInSeconds: 20,
        readTimeoutInSeconds: 20,
      },
      resultExpression: '',
      errorExpression: '',
      retries: 3,
      retryBackoff: 'PT0S',
      inputMappings: [],
      outputMappings: [],
      attrs: {
        icon: { iconType: 'service' },
        label: { text: 'HTTP Request' }
      }
    }, super.defaults());
  }
}
These properties are then surfaced in the inspector panel via getContentConfig(), giving users form fields for URL, method, headers, timeouts, and so on — no XML editing required:
getContentConfig() {
  return {
    groups: {
      http:     { label: 'HTTP Configuration', index: 1 },
      timeouts: { label: 'Timeouts', index: 2 },
      // ... retries, I/O mappings
    },
    inputs: {
      httpConfig: {
        url:    { type: 'text', label: 'URL', group: 'http', index: 1 },
        method: { type: 'select-box', label: 'Method', group: 'http', index: 2,
                  options: ['GET','POST','PUT','DELETE','PATCH'].map(m => ({ value: m, content: m })) },
        connectionTimeoutInSeconds: { type: 'number', label: 'Connection Timeout', group: 'timeouts', index: 1 },
        // ...
      },
    }
  };
}
This is the core of the integration. JointJS+ exports clean BPMN 2.0 XML via toBPMN, but Camunda 8 needs more: Zeebe extension elements for task definitions, connector configuration, I/O mappings, and specific namespace declarations. The approach is to post-process the exported XML DOM before serializing it to a string.
Every service task must have a <zeebe:taskDefinition>. HTTP Connector tasks additionally need <zeebe:ioMapping> with connector-specific inputs (URL, method, headers, timeouts) and <zeebe:taskHeaders> for result/error expressions. The <process> element must be marked isExecutable="true". And the XML must declare the Zeebe namespace.
Here's what the exported XML looks like for an HTTP Connector element:
<serviceTask id="idabc" name="Call LLM"
zeebe:modelerTemplate="io.camunda.connectors.HttpJson.v2">
<extensionElements>
<zeebe:taskDefinition type="io.camunda:http-json:1" retries="3" />
<zeebe:ioMapping>
<zeebe:input source="="POST"" target="method" />
<zeebe:input source="="https://api.example.com"" target="url" />
<zeebe:input source="={"prompt": question}" target="body" />
<zeebe:input source="=120" target="readTimeoutInSeconds" />
<zeebe:output source="=response.body.result" target="answer" />
</zeebe:ioMapping>
<zeebe:taskHeaders>
<zeebe:header key="resultVariable" value="httpResult" />
<zeebe:header key="resultExpression" value="=body.choices[1].text" />
</zeebe:taskHeaders>
</extensionElements>
</serviceTask>The function walks the JointJS graph to collect element properties, exports the BPMN XML, then modifies the DOM:
function processXMLWithZeebeExtensions(paper, processName) {
  // 1. Collect element properties from the JointJS graph
  const httpConnectorConfigs = new Map();
  const elementInputMappings = new Map();
  const elementOutputMappings = new Map();

  for (const element of paper.model.getElements()) {
    const bpmnId = 'id_' + element.id;
    // ... collect httpConfig, inputMappings, outputMappings per element
  }

  // 2. Export standard BPMN XML
  const { xml } = toBPMN(paper, bpmnExportOptions);

  // 3. Add Zeebe namespace and mark process as executable
  const definitions = xml.getElementsByTagNameNS(bpmnNS, 'definitions')[0];
  definitions.setAttribute('xmlns:zeebe', zeebeNS);

  const processElements = xml.getElementsByTagNameNS(bpmnNS, 'process');
  for (const proc of processElements) {
    proc.setAttribute('isExecutable', 'true');
  }

  // 4. Add zeebe:taskDefinition, ioMapping, taskHeaders to each service task
  // ...

  // 5. Remove unsupported message flows

  // 6. Reorder process children for BPMN schema compliance

  return new XMLSerializer().serializeToString(xml);
}One thing that's easy to miss: Camunda strictly validates the BPMN 2.0 XML schema, which requires children of <process> in a specific order — flow elements first, then sequence flows, then artifacts. The toBPMN library outputs them in graph traversal order, which may not match. A reordering step before serialization fixes this:
const flowElementTags = new Set([
  'startEvent', 'endEvent', 'serviceTask', 'exclusiveGateway',
  'boundaryEvent', 'intermediateCatchEvent', /* ... */
]);

for (const proc of processElements) {
  const children = Array.from(proc.childNodes);
  const flowElements = [], sequenceFlows = [], artifacts = [], other = [];

  for (const child of children) {
    if (child.nodeType !== 1) { other.push(child); continue; }
    if (flowElementTags.has(child.localName)) flowElements.push(child);
    else if (child.localName === 'sequenceFlow') sequenceFlows.push(child);
    else if (['association','textAnnotation','group'].includes(child.localName)) artifacts.push(child);
    else other.push(child);
  }

  // Re-appending moves each node to the end, effectively reordering
  for (const child of [...other, ...flowElements, ...sequenceFlows, ...artifacts]) {
    proc.appendChild(child);
  }
}

With the XML post-processing in place, the toolbar actions are straightforward.
Deploy exports the graph, enriches the XML, and sends it to the middleware:
async function onDeployProcessClick(context) {
  const xmlString = processXMLWithZeebeExtensions(paper, processName);

  const formData = new FormData();
  formData.append('bpmn', new Blob([xmlString], { type: 'application/xml' }), `${processName}.bpmn`);

  const response = await fetch('http://localhost:3000/api/deploy', { method: 'POST', body: formData });
  const result = await response.json();
}
Load is where things get interesting — and where the import preservation concern comes in.
When you load BPMN XML back into JointJS (either from Camunda or from a local file), the fromBPMN importer only understands standard BPMN 2.0. It silently discards Zeebe extension elements. If you import the XML directly, all connector configuration, I/O mappings, and task headers are lost.
The solution is a three-phase pipeline: extract → mark → restore.
Before import, parse the XML and pull Zeebe-specific properties into a side map. For each service task, detect whether it's an HTTP Connector (via the zeebe:modelerTemplate attribute), and collect its configuration from the ioMapping inputs and taskHeaders:
function extractZeebeExtensions(xmlDoc) {
  const extensions = new Map();
  // For each serviceTask: detect type, extract httpConfig, expressions,
  // retries, input/output mappings from zeebe:ioMapping and zeebe:taskHeaders
  return extensions;
}JointJS uses cell factories to decide which shape class to instantiate during import. By default, every <serviceTask> becomes a generic Service Task. To ensure HTTP Connectors are created with the right class (so the inspector shows the correct property panel), we inject a custom attribute into the XML before import:
function markHttpConnectorsInXML(xmlDoc, extensions) {
  for (const [taskId, data] of extensions) {
    if (data.type === 'httpConnector') {
      const task = findTaskById(xmlDoc, taskId);
      task.setAttributeNS('http://jointjs.com/bpmn', 'joint:type', 'activity.HttpConnector');
    }
  }
}
This pairs with a cell factory that reads the attribute:
// In factories.js
serviceTask: (xmlNode, _xmlDoc, _shapeClass, defaultFactory) => {
  const defaultElement = defaultFactory();
  const jointType = xmlNode.getAttribute('joint:type');
  const appElement = jointType === 'activity.HttpConnector'
    ? new HttpConnector({ id: defaultElement.id })
    : new Service({ id: defaultElement.id });
  appElement.copyFrom(defaultElement);
  return appElement;
}After fromBPMN has created the JointJS elements, write the extracted properties back onto the model. This is what makes the inspector panel show the right values, and what ensures the next export includes the Zeebe extensions again:
function restoreZeebeExtensions(paper, extensions) {
  for (const element of paper.model.getElements()) {
    const bpmnId = element.get('bpmnId') || ('id_' + element.id);
    const data = extensions.get(bpmnId);
    if (!data) continue;

    if (data.type === 'httpConnector') {
      element.set('httpConfig', data.config);
      element.set('resultExpression', data.resultExpression);
      element.set('retries', data.retries);
      element.set('inputMappings', data.inputMappings);
      element.set('outputMappings', data.outputMappings);
    } else if (data.type === 'serviceTask') {
      element.set('resultExpression', data.zeebeHeaders.resultExpression);
      element.set('inputMappings', data.inputMappings);
      element.set('outputMappings', data.outputMappings);
    }
  }
}
The complete load function ties it all together:
async function loadProcessIntoCanvas(context, process) {
  const response = await fetch(`http://localhost:3000/api/process-xml/${process.processDefinitionKey}`);
  const { bpmnXml } = await response.json();

  const xmlDoc = new DOMParser().parseFromString(bpmnXml, 'application/xml');

  const extensions = extractZeebeExtensions(xmlDoc);  // 1. Extract
  markHttpConnectorsInXML(xmlDoc, extensions);         // 2. Mark
  await xmlFileImporter.import(asFile(xmlDoc), paper.model);
  restoreZeebeExtensions(paper, extensions);           // 3. Restore
}
Don't forget local file import. The "Load BPMN XML" (from file) path must use the same extract → mark → restore pipeline. If it calls fromBPMN directly, Zeebe extensions are silently lost.
Starting from the JointJS+ BPMN Editor demo provided the rendering, layout, stencil, and inspector out of the box. The Camunda integration itself comes down to XML manipulation: enriching the output with Zeebe extensions on export, and preserving those extensions through the import round-trip. The extract → mark → restore pipeline for import is the most complex part — if you're adapting this approach, that's where most of the debugging time will go.
The middleware layer is deliberately thin — it translates browser HTTP calls into Zeebe gRPC operations and keeps OAuth tokens server-side. As noted above, you could eliminate the gRPC dependency entirely by using the Orchestration REST API for all operations, which would simplify the middleware to a straightforward HTTP proxy with auth. There's nothing Node.js-specific about it; any backend that can serve HTTP would work.
For the full working implementation, see the demo source code on GitHub.
Happy diagramming! 👋


.png)